How to create fast, scalable applications with VueJS and Firebase (part two)
In this second part of this blog post series I will share my learnings on creating a notes app. We will handle creating, updating and deleting notes and adding authentication. Please find part one of this blog post series here, in which we have set up our Firebase database and Vue application to display notes.
What are we creating?

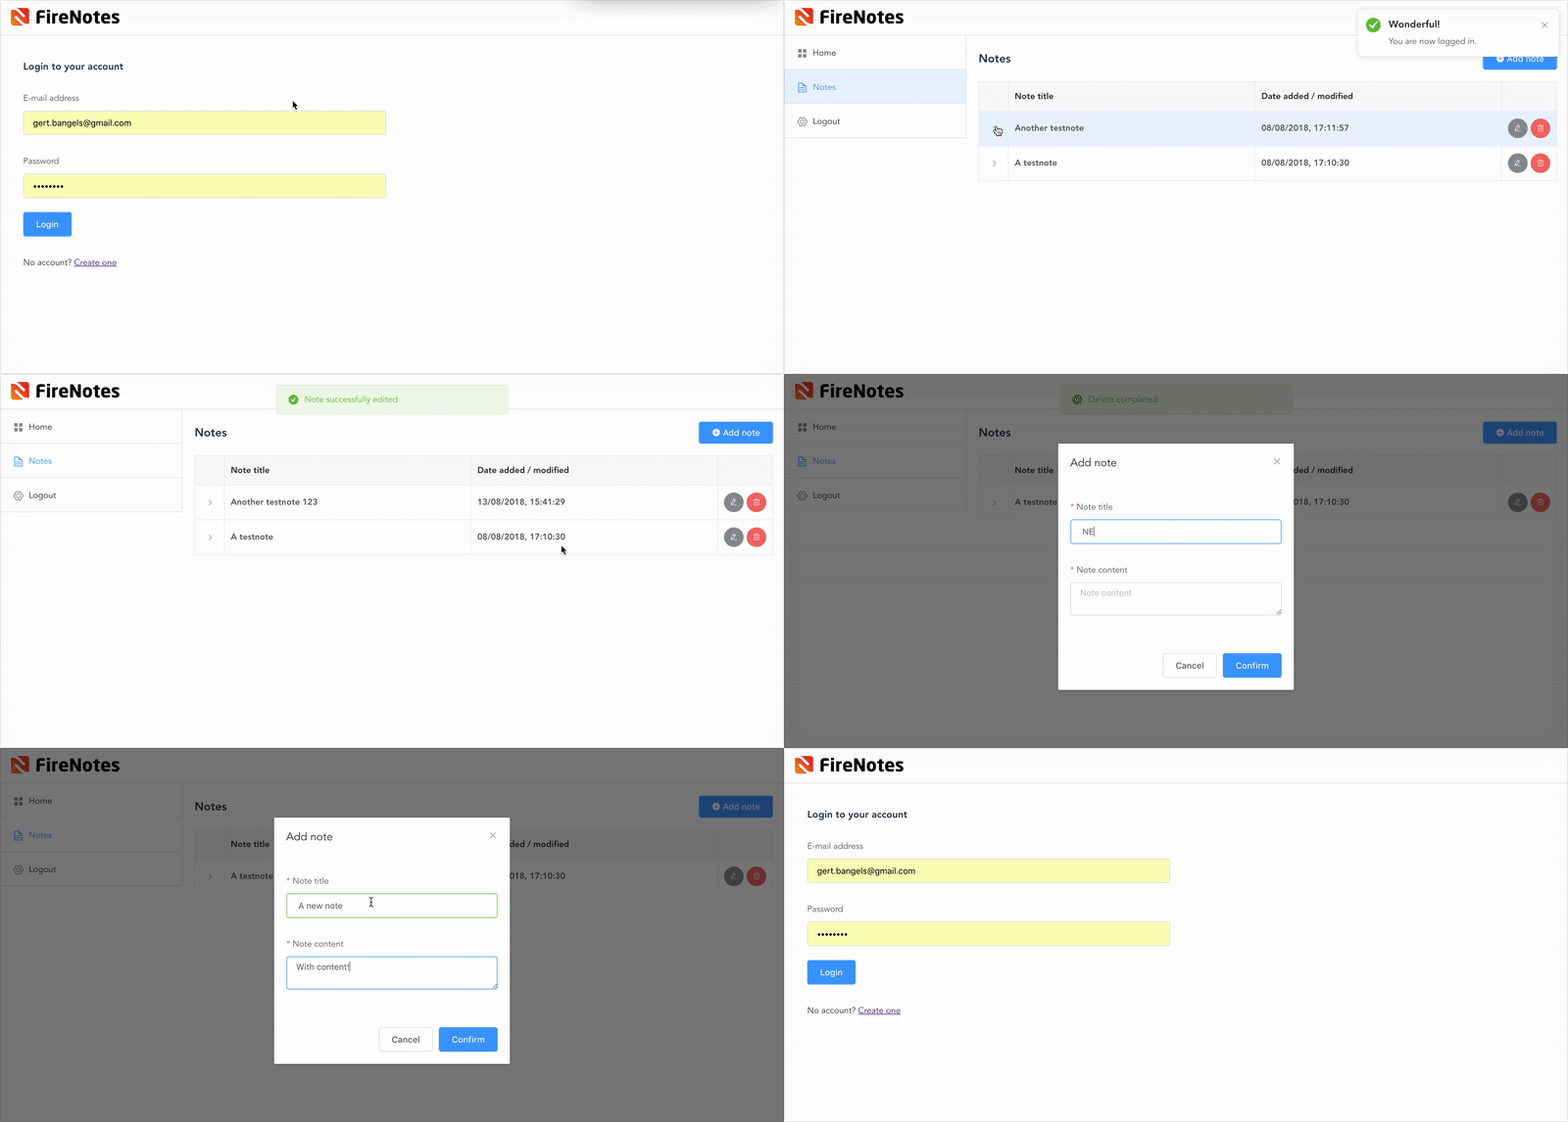
Building upon our previous work, we will finalize our notes app.
Depending on your skill level, the following steps will take you approximately 20 to 45 minutes to complete.
Step 1: Adding notes
From our previous blog post we already have reading notes in place, but that required adding them manually in our Firestore database. Let’s create the functionality that enables us to add notes directly via the interface of our application. In Notes.vue:
<template>
  <div class="notes">
    <h1>
      Notes
      <el-button type="primary" size="medium" @click="addDialogVisible = true"><i class="el-icon-circle-plus"></i> Add note</el-button>
    </h1>
    <el-table
      :data="tableData"
      empty-text="Loading, or no records to be shown."
      border>
      <el-table-column type="expand">
        <template slot-scope="props">
          <p>{{ props.row.content }}</p>
        </template>
      </el-table-column>
      <el-table-column
        label="Note title">
        <template slot-scope="props">
          {{ props.row.title }}
        </template>
      </el-table-column>
      <el-table-column
        label="Date added / modified"
        prop="date">
      </el-table-column>
      <el-table-column
        fixed="right"
        label=""
        width="90">
        <template slot-scope="scope">
          <el-button type="info" size="small" icon="el-icon-edit" circle></el-button>
          <el-button type="danger" size="small" icon="el-icon-delete" circle style="margin-left: 5px;"></el-button>
        </template>
      </el-table-column>
    </el-table>
    <el-dialog
      title="Add note"
      :visible.sync="addDialogVisible"
      width="30%">
      <el-form ref="addNoteRuleForm" :model="addNoteRuleForm" :rules="rules">
        <el-form-item label="Note title" prop="title">
          <el-input type="text" placeholder="Note title" v-model="addNoteRuleForm.title"></el-input>
        </el-form-item>
        <el-form-item label="Note content" prop="content">
          <el-input type="textarea" placeholder="Note content" v-model="addNoteRuleForm.content"></el-input>
        </el-form-item>
      </el-form>
      <span slot="footer" class="dialog-footer">
        <el-button @click="addDialogVisible = false">Cancel</el-button>
        <el-button type="primary" @click="addNoteForm('addNoteRuleForm'); addDialogVisible = false;">Confirm</el-button>
      </span>
    </el-dialog>
  </div>
</template>
<script>
import { db } from '@/main'
export default {
  name: 'Notes',
  data() {
    return {
      tableData: [],
      addDialogVisible: false,
      addNoteRuleForm: {
        title: '',
        content: ''
      },
      rules: {
        title: [
          { required: true, message: "Note title can't be empty", trigger: 'blur' }
        ],
        content: [
          { required: true, message: "Note content can't be empty", trigger: 'blur' }
        ]
      }
    }
  },
  created () {
    db.collection('notes').get().then(querySnapshot => {
      querySnapshot.forEach(doc => {
        const data = {
          'id': doc.id,
          'date': doc.data().date,
          'title': doc.data().title,
          'content': doc.data().content
        }
        this.tableData.push(data)
      })
    })
  },
  methods: {
    addNoteForm (formName) {
      var self = this;
      this.$refs[formName].validate((valid) => {
        if (valid) {
          console.log('Form valid');
        } else {
          console.log('error submit!!')
        }
      })
    }
  }
}
</script>
The code above shows that we added a @click=”addDialogVisible = true” handler to our ‘Add note’ button, and registered it in our ‘data’ hook to be false as default.
We also added the dialog itself which will show based on this ‘addDialogVisible’ value. Inside this dialog we added an ElementUI form with title and content fields that have some validation rules, also specified in our data hook.
Now, when we press the button to add the note, we will pass the refs of our formname, which will return a Vue Object containing the fields that need validation.
Next up, let’s add our database query. Change the ‘addNoteForm’ method as follows:
  addNoteForm (formName) {
      var self = this;
      this.$refs[formName].validate((valid) => {
        if (valid) {
          var today = new Date().toLocaleString('en-GB');
          db.collection('notes').add({
            'title': this.addNoteRuleForm.title,
            'content': this.addNoteRuleForm.content,
            'date': today
          }).then(function (docRef) {
            self.$message({
              type: 'success',
              message: 'Note successfully added'
            });
          }).catch(function (error) {
            console.error('Error adding document: ', error)
          })
        } else {
          console.log('error submit!!')
        }
      })
    }
After testing this by submitting a valid form, you will see the success message. But there is still a problem with showing the freshly added note in our table. By refreshing the page, it will show up.
The reason for this is because we made the database call to fetch the notes to be executed via the ‘created’ hook. This will fire once when we open the page, but not after we update our database. Let’s make that a little more flexible by moving the get query to a method instead:
created () {
    this.getNotes()
  },
  methods: {
    getNotes () {
      db.collection('notes').orderBy('date').get().then(querySnapshot => {
        this.tableData = [];
        querySnapshot.forEach(doc => {
          const data = {
            'id': doc.id,
            'date': doc.data().date,
            'title': doc.data().title,
            'content': doc.data().content
          }
          this.tableData.push(data);
        })
      })
    },
    addNoteForm (formName) {
      var self = this;
      this.$refs[formName].validate((valid) => {
        if (valid) {
          var today = new Date().toLocaleString('en-GB');
          db.collection('notes').add({
            'title': this.addNoteRuleForm.title,
            'content': this.addNoteRuleForm.content,
            'date': today
          }).then(function (docRef) {
            self.getNotes();
            self.$message({
              type: 'success',
              message: 'Note successfully added'
            });
          }).catch(function (error) {
            console.error('Error adding document: ', error)
          })
        } else {
          console.log('error submit!!')
        }
      })
    }
  }
If you look closely, I’ve also added an orderBy(‘date’) to the query. If we add another note now, it will update our table flawlessly adding the latest note to the bottom row. Should you want this the other way round, change orderBy(‘date’) to orderBy(‘date’, ‘desc’).
Step 2: Deleting notes
Deleting an item is pretty easy, but from a user experience perspective, shouldn’t be too easy either. That’s why I’ve decided to handle the delete after a ElementUI confirm message box.
First add an @click handler on the delete icon where we send the ID of the note we want to delete:
<template slot-scope="props">
  <el-button type="info" size="small" icon="el-icon-edit" circle></el-button>
  <el-button type="danger" size="small" icon="el-icon-delete" circle style="margin-left: 5px;" @click="deleteNote(props.row.id)"></el-button>
</template>
Please note that I also changed the slot-scope=”scope” tot slot-scope=”props” in the template tag to match with the rest of the props that get passed on to the table.
Next, let’s register the deleteNote method:
  deleteNote (noteId) {
      var self = this;
      this.$confirm('This will permanently delete the note. Continue?', 'Warning', {
        confirmButtonText: 'OK',
        cancelButtonText: 'Cancel',
        type: 'warning'
      }).then(() => {
        db.collection('notes').doc(noteId).delete().then(function() {
          self.getNotes();
          self.$message({
            type: 'success',
            message: 'Delete completed'
          });
        }).catch(function(error) {
          console.error("Error removing note: ", error);
        });
      }).catch(() => {
        console.log("Delete canceled");
      });
    }
Et voilà! Deleting notes is now fully covered.
Step 3: Editing notes
Just like our delete, add an edit handler on the edit button along with a ‘editDialogVisible’ value like we added for the ‘addDialog’.
<template slot-scope="props">
  <el-button type="info" size="small" icon="el-icon-edit" circle @click="editNote(props.row.id); editDialogVisible = true"></el-button>
  <el-button type="danger" size="small" icon="el-icon-delete" circle style="margin-left: 5px;" @click="deleteNote(props.row.id)"></el-button>
</template>
Next, we also need to create the dialog where the editing takes place:
    <el-dialog
      title="Edit note"
      :visible.sync="editDialogVisible"
      width="30%">
      <el-form ref="editNoteRuleForm" :model="editNoteRuleForm" :rules="rules">
        <el-form-item label="Note title" prop="title">
          <el-input type="text" placeholder="Note title" v-model="editNoteRuleForm.title" value="editNoteRuleForm.title"></el-input>
        </el-form-item>
        <el-form-item label="Note content" prop="content">
          <el-input type="textarea" placeholder="Note content" v-model="editNoteRuleForm.content" value="editNoteRuleForm.content"></el-input>
        </el-form-item>
      </el-form>
      <span slot="footer" class="dialog-footer">
        <el-button @click="editDialogVisible = false">Cancel</el-button>
        <el-button type="primary" @click="saveEditedNote('editNoteRuleForm', editNoteRuleForm); editDialogVisible = false;">Confirm</el-button>
      </span>
    </el-dialog>
Our data hook (we added editDialogVisible and editNoteRuleForm) then should be updated to:
  data() {
    return {
      tableData: [],
      addDialogVisible: false,
      addNoteRuleForm: {
        title: '',
        content: ''
      },
      editDialogVisible: false,
      editNoteRuleForm: {
        id: '',
        title: '',
        content: ''
      },
      rules: {
        title: [
          { required: true, message: "Note title can't be empty", trigger: 'blur' }
        ],
        content: [
          { required: true, message: "Note content can't be empty", trigger: 'blur' }
        ]
      }
    }
  }
Next to that, we also need to add an editNote method that fetches the data based on the note ID and populate the value of the editDialog fields:
    editNote (noteId) {
      var self = this;
      this.editNoteRuleForm.title = '';
      this.editNoteRuleForm.content = '';
      db.collection('notes').doc(noteId).get().then(function(doc) {
        if (doc.exists) {
          self.editNoteRuleForm.id = doc.id;
          self.editNoteRuleForm.title = doc.data().title;
          self.editNoteRuleForm.content = doc.data().content;
        } else {
          console.log("No such document!");
        }
      }).catch(function(error) {
        console.log("Error getting document:", error);
      });
    }
So far, retrieving the note in our edit dialog is covered, but we still need the saveEditedNote method:
    saveEditedNote (note, noteObj) {
      var self = this;
      var today = new Date().toLocaleString('en-GB');
      this.$refs[note].validate((valid) => {
        if (valid) {
          db.collection('notes').doc(noteObj.id).set({
            'title': noteObj.title,
            'content': noteObj.content,
            'date': today
          }).then(function() {
            self.getNotes();
            self.$message({
              type: 'success',
              message: 'Note successfully edited'
            });
          })
          .catch(function(error) {
            console.error("Error writing document: ", error);
          });
        }
      })
    }
Here we set our database record to the new value specified by our validated form fields, an updated date is also passed. On success a ‘Note successfully edited’ message is shown.
That’s it! Our mission to create a basic CRUD application based on VueJS and Firebase is a fact!

Bonus step: Authentication
Someone asked me about Authentication functionality in our previous blog post, so I’ll cover making a basic authentication for our app, based on the authentication API Firebase provides.
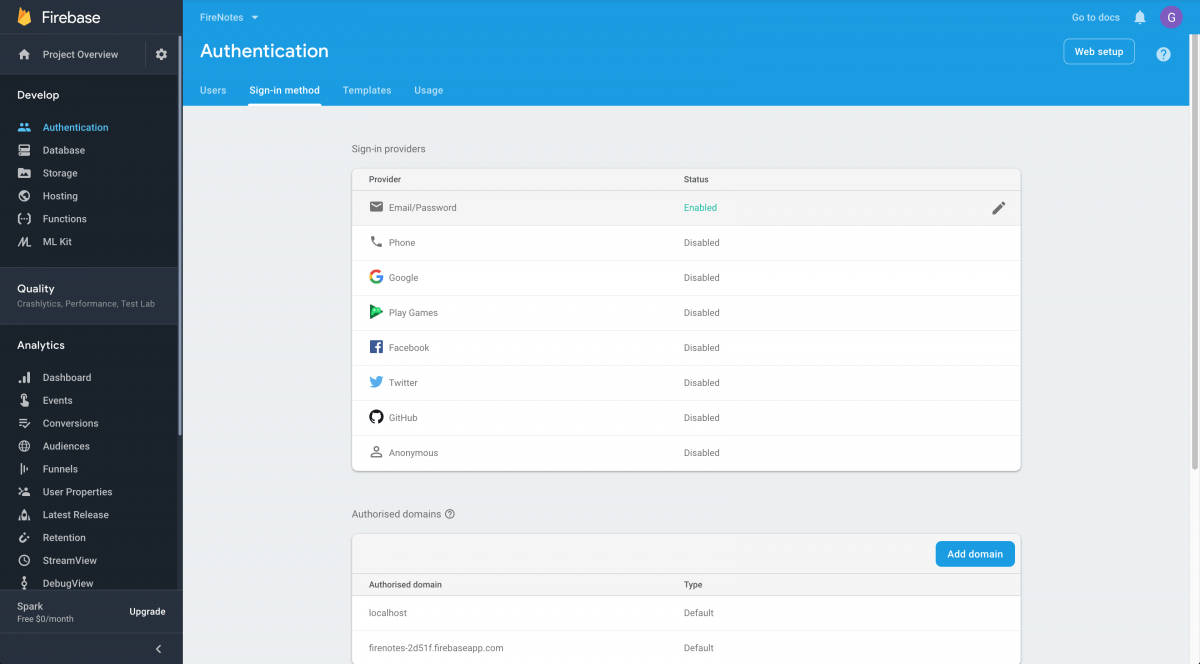
Head over to your Firebase console and navigate to the ‘Authentication’ link in the sidebar under ‘Develop’. For now, enable the simple Email/Password Authentication.

Now we can start building the login and register pages. Which are basically just forms like we handled before. The only difference here is that we use the firebase.auth().createUserWithEmailAndPassword and firebase.auth().signInWithEmailAndPassword methods.
Login.vue:
<template>
  <div class="login">

    <el-container>
      <el-main>
        <el-row :gutter="20">
          <el-col :span="12">

            <h1>Login to your account</h1>
            <el-form ref="form" :model="form">
              <el-form-item label="E-mail address">
                <el-input type="email" placeholder="E-mail" v-model="form.email"></el-input>
              </el-form-item>
              <el-form-item label="Password">
                <el-input type="password" placeholder="Password" v-model="form.password"></el-input>
              </el-form-item>
              <el-form-item>
                <el-button type="primary" v-on:click="login">Login</el-button>
              </el-form-item>
              <el-form-item>
                No account? <router-link to="/signup">Create one</router-link>
              </el-form-item>
            </el-form>

          </el-col>
        </el-row>
      </el-main>
    </el-container>

  </div>
</template>

<script>
import firebase from 'firebase'

export default {
  name: 'login',
  data: function () {
    return {
      form: {
        email: '',
        password: ''
      }
    }
  },
  methods: {
    login: function () {
      firebase.auth().signInWithEmailAndPassword(this.form.email, this.form.password).then(
        (user) => {
          this.$router.replace('/home')
          this.$notify({
            title: 'Wonderful!',
            message: 'You are now logged in.',
            type: 'success'
          })
        },
        (err) => {
          this.$message.error({
            message: 'Oops. ' + err.message
          })
        }
      )
    }
  }
}
</script>
SignUp.vue:
<template>
  <div class="sign-up">

    <el-container>
      <el-main>
        <el-row :gutter="20">
          <el-col :span="12">

            <h1>Sign up for a FireNotes account</h1>
            <el-form ref="form" :model="form">
              <el-form-item label="E-mail address">
                <el-input type="email" placeholder="E-mail" v-model="form.email"></el-input>
              </el-form-item>
              <el-form-item label="Password">
                <el-input type="password" placeholder="Password" v-model="form.password"></el-input>
              </el-form-item>
              <el-form-item>
                <el-button type="primary" v-on:click="signUp">Sign up</el-button>
              </el-form-item>
              <el-form-item>
                Already have an account? <router-link to="/login">Login</router-link>
              </el-form-item>
            </el-form>

          </el-col>
        </el-row>
      </el-main>
    </el-container>

  </div>
</template>

<script>
import firebase from 'firebase'

export default {
  name: 'SignUp',
  data: function () {
    return {
      form: {
        email: '',
        password: ''
      }
    }
  },
  methods: {
    signUp: function () {
      firebase.auth().createUserWithEmailAndPassword(this.form.email, this.form.password).then(
        (user) => {
          this.$router.replace('/home')
          this.$notify({
            title: 'Wonderful!',
            message: 'Your account has been created.',
            type: 'success'
          })
        },
        (err) => {
          this.$message.error({
            message: 'Oops. ' + err.message
          })
        }
      )
    }
  }
}
</script>
We’re still unable to see these views as we still need to update our routes. Head over to main.js and replace it with the following (don’t forget your API key and Project ID):
import Vue from 'vue'

import ElementUI from 'element-ui'
import 'element-ui/lib/theme-chalk/index.css'
Vue.use(ElementUI)

import firebase from 'firebase'
import 'firebase/firestore'
firebase.initializeApp({
  apiKey: 'yourApiKey',
  projectId: 'yourProjectId'
})
export const db = firebase.firestore()
const settings = { timestampsInSnapshots: true }
db.settings(settings)

import VueRouter from 'vue-router'
Vue.use(VueRouter)

import App from '@/App'
import HelloWorld from '@/components/HelloWorld'
import Notes from '@/components/Notes'
import Login from '@/components/Login'
import SignUp from '@/components/SignUp'

const routes = [
  {
    path: '*',
    redirect: '/login'
  },
  {
    path: '/',
    redirect: '/login'
  },
  {
    path: '/login',
    name: 'Login',
    component: Login
  },
  {
    path: '/signup',
    name: 'SignUp',
    component: SignUp
  },
  {
    path: '/home',
    name: 'HelloWorld',
    component: HelloWorld,
    meta: {
      requiresAuth: true
    }
  },
  {
    path: '/notes',
    name: 'Notes',
    component: Notes,
    meta: {
      requiresAuth: true
    }
  }
]

const router = new VueRouter({
  routes
})

router.beforeEach((to, from, next) => {
  const currentUser = firebase.auth().currentUser
  const requiresAuth = to.matched.some(record => record.meta.requiresAuth)
  if (requiresAuth && !currentUser) next('/login')
  else if (!requiresAuth && currentUser) next('/home')
  else next()
})

/* eslint-disable no-new */
firebase.auth().onAuthStateChanged(function (user) {
  new Vue({
    el: '#app',
    router: router,
    render: h => h(App),
    components: { App }
  })
})
Here we added some routes for login and signup, and added meta: { requiresAuth: true; } to the pages we want restricted access on. We check with Firebase if the user is authenticated in the router.beforeEach function, before registering it in our app. When the auth state changes the check is done again.
So now it works pretty well, but we want to hide the sidebar navigation if the user isn’t logged in, so we added the created hook and the v-if on <el-aside>. We also added a logout link to the navigation. Our App.vue file looks like this now:
<template>
  <div id="app">
    <el-container>
      <el-header>
        <img class="logo" src="./assets/logo.png" />
      </el-header>
      <el-container>
        <el-aside width="300px" v-if="user">
          <el-menu
            default-active="home"
            :router="true"
            class="el-menu-vertical-demo">
            <el-menu-item index="home">
              <i class="el-icon-menu"></i>
              <span>Home</span>
            </el-menu-item>
            <el-menu-item index="notes">
              <i class="el-icon-document"></i>
              <span>Notes</span>
            </el-menu-item>
            <el-menu-item index="/logout" v-on:click="logout">
              <i class="el-icon-setting"></i>
              <span>Logout</span>
            </el-menu-item>
          </el-menu>
        </el-aside>
        <el-main>
          <router-view/>
        </el-main>
      </el-container>
    </el-container>
  </div>
</template>

<script>
import firebase from 'firebase'
export default {
  name: 'App',
  created () {
    this.user = firebase.auth().currentUser || false;
  },
  methods: {
    logout: function () {
      firebase.auth().signOut().then(() => {
        this.$router.replace('/login')
      })
    }
  }
}
</script>

<style>
  html, body { margin: 0; }
  body {
    font-family: 'Avenir', Helvetica, Arial, sans-serif;
    -webkit-font-smoothing: antialiased;
    -moz-osx-font-smoothing: grayscale;
    color: #2c3e50;
  }
  .el-header { border-bottom: 1px solid #e6e6e6; display: flex; align-items: center; width: 100%; }
  .el-header button { float: right; }
  .el-menu-item { border-bottom: 1px solid #e6e6e6; }
  .logo { max-width: 50%; max-height: 50%; margin-right: auto; }
</style>
And there we have it, a single page notes application where you can create an account, login and create, read, update and delete notes.
Feel free to use this code / knowledge to adapt or build upon for creating your very own VueJS / Firebase projects. Let me know how you did!
Questions, remarks?
Can’t get it to work? Need a more in depth explanation of certain bits of code? We’re all ears. Simply let us know and we will get back to you as soon as possible.


